A Crash Course in Essential Linux Terminal Commands
Welcome beginners and curious people interested in WordPress! In our ongoing quest to equip you for the full-stack developer journey, we’ve set sail on a voyage of exploration through the essential tools and technologies. Our previous two instalments delved into the dynamic world of web development. First, we explored the power of JavaScript and jQuery in “Brewing the Web with JavaScript and JQuery as part of Full-Stack Developer Odyssey,” where we unveiled how these languages can add interactivity and manipulate elements on your web pages.
Following that, we ventured into the realm of the Document Object Model (DOM) in “My Elements have Class, said the DOM to the Browser,” providing insights into how web browsers structure and manage web pages. Now, we set our sights on the Linux terminal, a powerful command-line interface that unlocks a treasure trove of possibilities within your operating system.
This blog post marks the exciting beginning of a new series focused on website development and programming for WordPress. We’ll be diving into practical samples and tips to help you extend and modify the WordPress framework.
To get the most out of this series, having some basic familiarity with the terminal will be beneficial. The terminal, also known as the command-line interface (CLI), is a powerful interface that allows you to directly interact with your computer. This series, and many future cloud computing posts, will heavily utilise the terminal for various tasks. In the next post, we’ll be guiding you through installing Docker, a powerful tool for creating isolated development environments, which we’ll interact with using the terminal.
While Docker can run on Windows, we’ll be focusing on its use with Linux in this series. If you’re not already using Linux, you can easily set up a virtual machine for development purposes. Here’s an article that deals with virtualization to help you get started.
Throughout this series, we’ll be using the terminal extensively to interact with Docker and the underlying system. This opening post will equip you with the essential terminal commands you’ll need to navigate the upcoming tutorials.
So, let’s jump in and get started with the terminal!
Where to find Terminal
The two quickest ways to find Terminal are:
- Keyboard Shortcut: Press simultaneously on your keyboard: CTRL + ALT + T
- Search: Click the Super Key and in the search window type: Terminal. Then find and click the icon.
When to use Terminal
The terminal is powerful and can be used for many tasks on your computer. It can often save you time by letting you add and remove applications with simple commands, eliminating the need to download installer programs. Here are some alternative names for Terminal you might encounter:
- Console
- Shell
- Command Line
- Command Prompt
Let’s get started
While this guide will introduce some commands, it’s important to avoid routinely logging in as root. Logging in as root grants very high levels of access to the system, and any mistakes could have serious consequences.
A better approach is to use the sudo command before commands that require elevated privileges. sudo stands for “superuser do” and will prompt you for your password before executing the command with root privileges.
Here’s an example:
sudo <command>Once you’ve finished using sudo, you can log out of the terminal session using the exit command.
Navigating the Terminal:
The terminal window can be resized using the standard window controls on your operating system. Additionally, many terminal applications allow you to use the Window key in combination with arrow keys to move the window or maximize/minimize its size.
Clearing the Screen:
As you work in the terminal, you may want to clear the screen to start fresh. You can achieve this in two ways:
- Keyboard Shortcut: Press Ctrl + L simultaneously.
- Command: Type the clear command and press Enter.
Directory Commands
Understanding Your Workspace: Directories and Files
The terminal provides an interface to navigate and manage your computer’s file system. This system uses directories (sometimes called folders) to organize files.
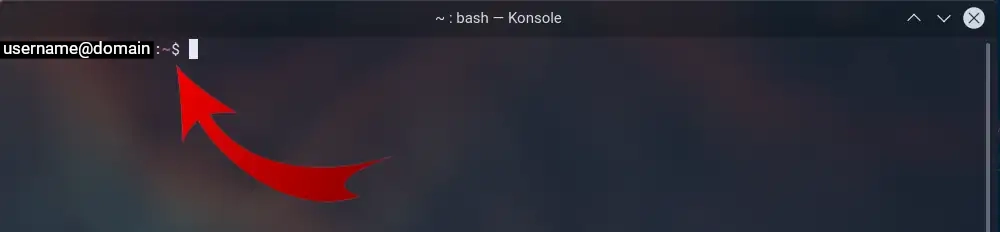
- Terminal Prompt: When you open the terminal, you’ll see a prompt that resembles <username>@<machine name>:~$. This indicates your current user and machine, followed by the tilde (~) symbol representing your home directory.
Directories vs. Files: Similar to Windows, directories act like folders to hold files (documents) within them.
Navigating Directories
- Present Working Directory (pwd): Use the pwd command to view the path of your current directory location.
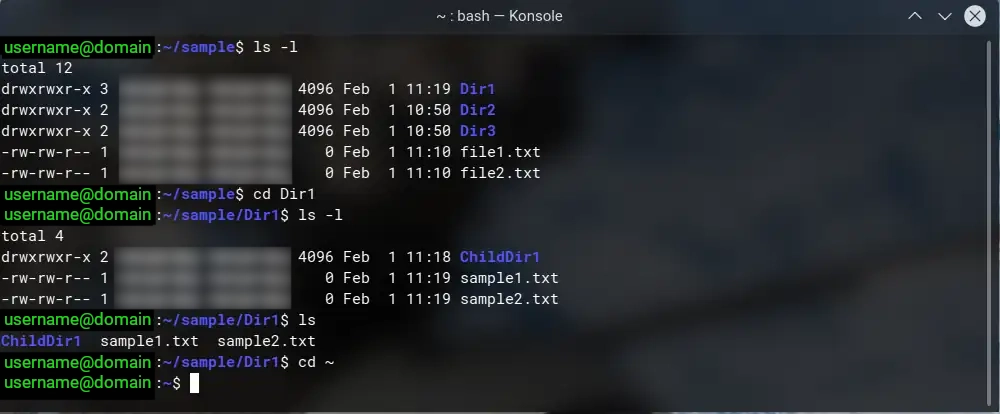
- Listing Directory Contents (ls): The ls command displays the contents of the current directory. Here are some variations for different output formats:
- ls: Basic listing of filenames.
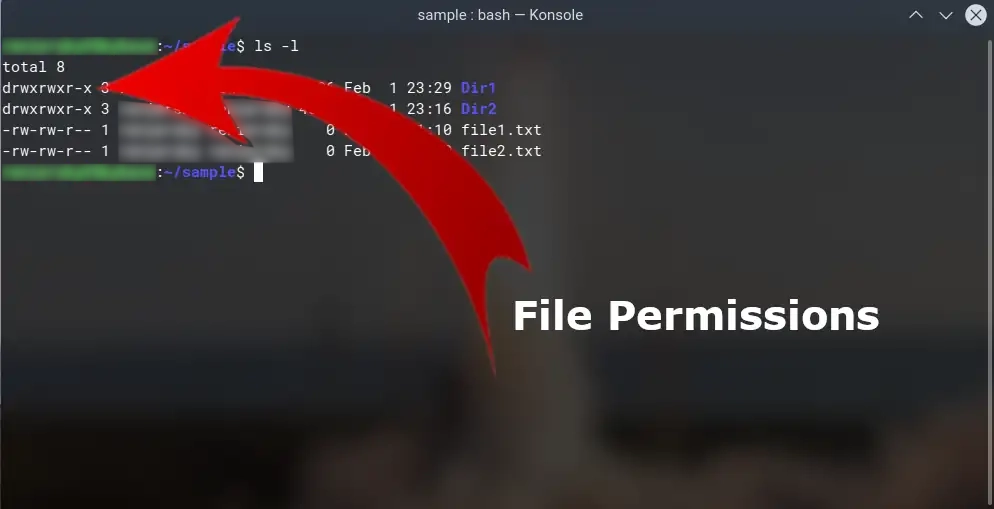
- ls -l: Detailed listing showing permissions, owner, group, size, and date/time for each file/directory. ls -l command output]
- ls -la: Includes hidden files (starting with “.”) in the detailed listing. ls -la command output]

- Navigate Between Directories (cd): Use the cd command to change directories. Remember that Linux is case-sensitive for commands and directory names.
- cd ..: Move up one directory to the parent directory.
- cd ~: Go to your home directory.
- cd <directory_name>: Move into a specific directory named <directory_name>.
Creating and Removing Directories
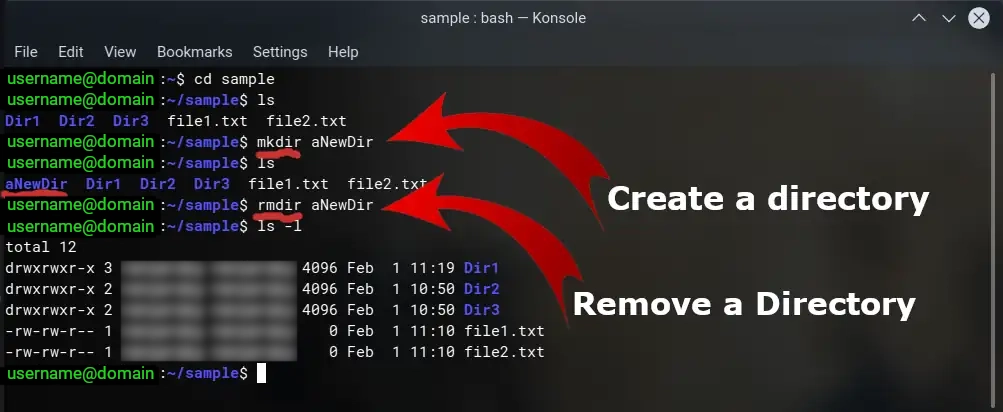
- Creating Directories (mkdir): Use the mkdir <directory_name> command to create a new directory named <directory_name>.
- Removing Directories (rmdir): Use the rmdir
command to remove an empty directory. - Caution! Be mindful that removed directories cannot be recovered.
- Removing directories with content (rmdir -R): To remove a directory containing files, use rmdir -R <directory_name>. This option is recursive and will permanently delete the directory and all its contents.
Note: Spaces in directory names will create separate directories.
File Commands
Need to create a new file? The terminal offers a couple of methods to get you started.
- Empty Files with touch: The touch command is a quick way to create an empty file. Simply type touch followed by your desired filename and extension (e.g., touch myfile.txt). If you don’t specify an extension, the system will typically create a .txt file by default. This is useful for setting up placeholder files or initiating files that will be populated later.
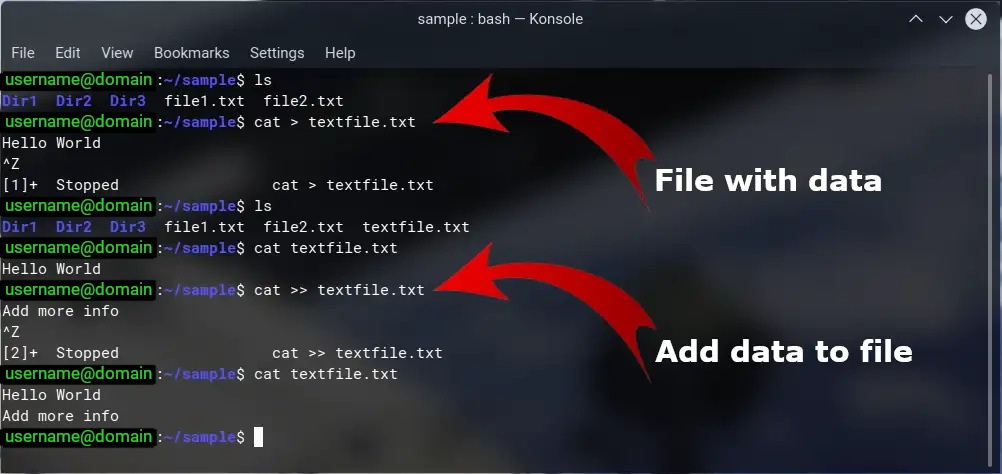
- Creating Files with Content (cat): The cat command has a hidden talent – it can also be used to create files and add content directly within the terminal. Here’s the workflow:
- Type cat > filename.txt (replace filename.txt with your chosen filename). This opens the file for writing in the terminal.
- Type the content you want to add to the file. Hit enter for each new line.
- Once you’ve finished adding content, press Ctrl+D (on most systems) to save the file and exit. This key combination signals the end of your input.
Viewing File Contents (cat)
Curious about what’s inside a file? Use the cat command followed by the filename (e.g., cat myfile.txt). This will display the contents of the file in the terminal window. If you’re dealing with a particularly long file, you can use cat less filename to view the content in smaller, more manageable sections. The less command allows you to navigate through the file content page by page.
Copying and Moving Files
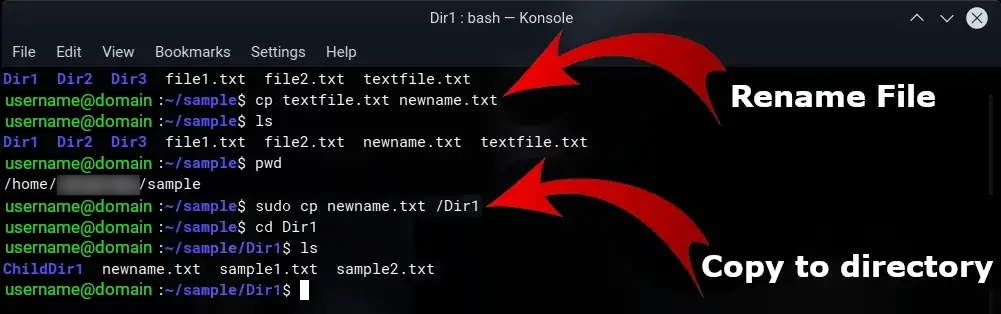
- Copying Files (cp): The cp command is your friend when it comes to duplicating files. The basic syntax is cp sourcefile targetfile. Replace sourcefile with the filename you want to copy and targetfile with the desired filename or path for the copy. For example, cp important_data.txt backup/data.txt would create a copy of important_data.txt named data.txt inside the backup directory.
- Copying to Directories: You can also copy files directly into directories using sudo cp filename /directory/name. Remember, using sudo grants elevated privileges, so exercise caution when using it.
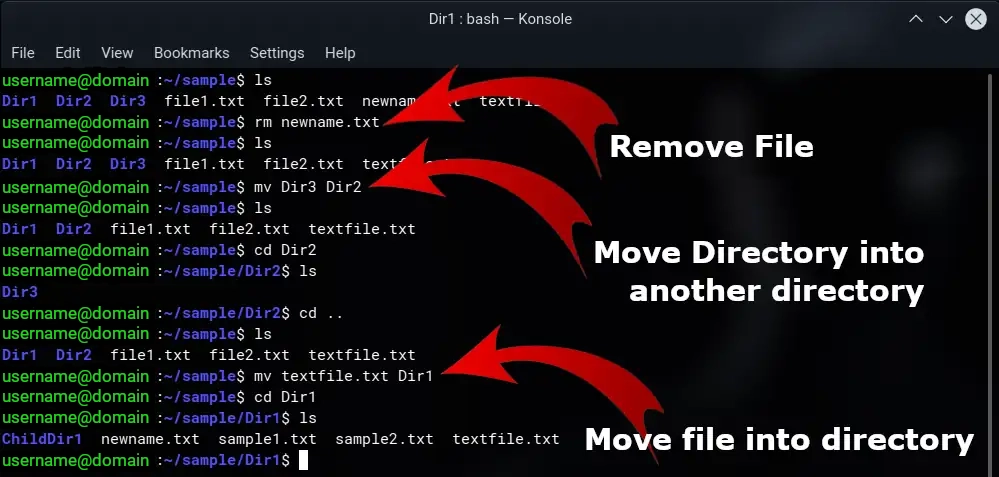
- Moving Files (mv): The mv command serves two purposes: moving and renaming files. Here’s how it works:
- Moving Files: Use mv sourcefile targetfile to move the sourcefile to a new location specified by targetfile. The targetfile can be a new filename within the current directory or a path to a different directory. For instance, mv old_report.docx reports/new_report.docx would move the old_report.docx file and rename it to new_report.docx inside the reports directory.
- Renaming Files: You can simply use mv filename new_filename to rename a file within the current directory. The filename is replaced with the new desired name new_filename.
Removing Files (rm)
The rm command permanently removes files. Since deleted files cannot be recovered by default, use rm with caution. Make sure you’ve double-checked that you’re deleting the correct file before proceeding. The syntax is simply rm filename, where filename is the file you want to remove.
Introducing Nano: A User-Friendly Terminal Text Editor
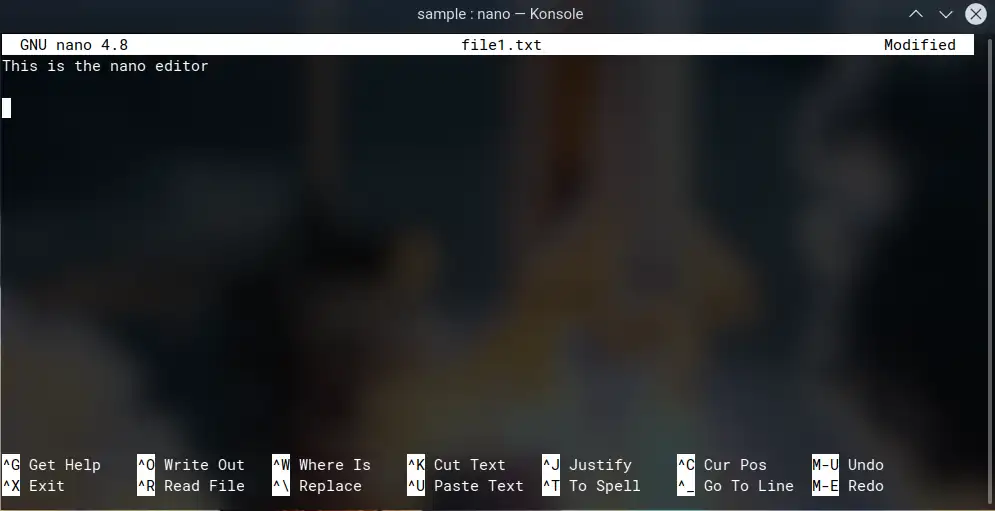
When it comes to editing text files directly within the terminal, Nano shines as a user-friendly and versatile option. Unlike graphical editors, Nano operates within the command line interface, offering a lightweight and efficient way to modify your files.
Key Features of Nano:
- Intuitive Interface: Nano boasts a clear and uncluttered interface that’s easy to navigate, even for beginners. The bottom portion of the screen displays helpful keyboard shortcuts for common editing tasks.
- Syntax Highlighting: For developers and programmers, Nano provides syntax highlighting, which improves code readability by colour-coding keywords and elements specific to different programming languages.
- Basic Formatting: While not a full-fledged word processor, Nano allows for basic text formatting, such as bold, italics, and text centring. This can be useful for adding basic structure and emphasis to your text files.
- Copy & Paste: Essential editing functionalities like copy and paste are readily available in Nano. You can use keyboard shortcuts to manipulate text selections within the file.
- Spell Checking (Optional): While not inherently enabled, Nano can be configured to offer spell-checking functionality. This can be helpful for catching typos and grammatical errors in your text.
Opening and Editing Files with Nano:
The process of opening and editing a file with Nano is straightforward:
- Navigate to the File: Ensure you’re positioned in the correct directory containing the file you want to edit using terminal navigation commands like cd.
- Launch Nano: Type nano <filename> (replace <filename> with the actual filename) and press Enter. This will launch the Nano editor with the specified file loaded.
- Editing Your Text: Make your desired edits directly within the Nano interface. Use the arrow keys to navigate through the text and function keys or keyboard shortcuts for editing actions (explained at the bottom of the screen).
- Saving Changes: Once you’ve finished editing, press Ctrl+O to save your changes. Nano will prompt you for confirmation if the file already exists.
- Exiting Nano: To exit Nano, press Ctrl+X. Again, Nano will prompt you to confirm saving changes if necessary.
Beyond the Basics: Tips for Efficient Nano Usage
- Search & Replace: Utilize the built-in search and replace functionality (Ctrl+H) to quickly locate and modify specific text within the file.
- Undo/Redo: Nano allows you to undo (Ctrl+Z) and redo (Ctrl+R) your edits, providing a safety net for accidental changes.
- Moving Lines: Easily move lines of text up or down using the Ctrl+K and Ctrl+J shortcuts, respectively.
- Cut & Paste Buffers: Nano maintains a cut buffer for storing your most recent cut selection. You can paste the content from the buffer using Ctrl+U.
By mastering these functionalities, you can effectively navigate and edit your text files within the terminal using Nano.
Additional Resources:
The official Nano website provides comprehensive documentation and tutorials: https://www.nano-editor.org/dist/v2.2/nano.html
Understanding File Permissions: The Cornerstone of File Security
In the world of computer systems, file permissions play a crucial role in maintaining data security and integrity. They dictate who (users, groups, or the public) can access, modify, or execute files and directories within your system. Understanding and managing file permissions effectively is essential for protecting your data and ensuring a secure computing environment.
Decoding Permission Strings: A Breakdown of the Syntax
When you list directory contents using the ls -l command, you might encounter cryptic letter combinations like drwxr-xr-x. These represent the file permissions associated with each entry.
Let’s break down the components of this permission string:
- File Type: The first character indicates the file type. For example, – represents a regular file, d represents a directory, and other characters like l (symbolic link) and c (character device) may also appear.
- Owner Permissions: The next three characters represent the permissions granted to the file owner (the user who created the file). These permissions can be:
- r (read): Allows the owner to view the contents of the file.
- w (write): Allows the owner to modify the contents of the file.
- x (execute): Allows the owner to execute the file if it’s a program or script.
- Group Permissions: The following three characters represent the permissions assigned to the group associated with the file. A group is a collection of users who can share certain access rights. The permissions follow the same format as owner permissions (r, w, and x).
- Public Permissions: The final three characters represent the permissions granted to the public (all users on the system). These permissions also follow the same format (r, w, and x).
Permissions in Action: Real-World Examples
Here are some practical examples to illustrate how file permissions work:
- Read-Only File (rw-r–r–): In this scenario, the owner (user who created the file) has read and write access, allowing them to view and modify the file. The group members can only read the file, and the public has no access at all. This might be suitable for a configuration file that needs to be modified by the owner but shouldn’t be tampered with by others.
- Executable Script (rwxr-xr-x): This permission setting allows the owner, group members, and the public to execute the file (assuming it’s a script or program). This is commonly used for system utilities or applications accessible to all users.
- Private Directory (drwx——): Here, the owner has full control (read, write, and execute) over the directory. Group members and the public are completely denied access. This might be appropriate for a directory containing highly sensitive data that only the owner should be able to access.
File Permissions: Beyond Letters – The Numerical Representation
While file permissions are commonly displayed using letter combinations (e.g., rwxr-xr-x), there’s an alternative numerical representation that might seem more cryptic at first glance. This method assigns numerical values to each permission:
- Read (r): 4
- Write (w): 2
- Execute (x): 1
To calculate the overall permission value for a file or directory, you simply add the values of the permissions granted to the owner, group, and public. For instance, consider a file permission string of rw-r–r–. Here’s how the numerical value would be derived:
- Owner (rw-): read (4) + write (2) = 6
- Group (-r–): read (4) only = 4
- Public (–r–): read (4) only = 4
Adding these permission values together (6 for owner + 4 for group + 4 for public), we get a total permission value of 14.
Benefits of Numerical Representation
The numerical representation offers a more compact way to express file permissions, especially when dealing with scripting or automation tasks. However, for everyday use, the letter-based format is generally considered more intuitive for human understanding.
Converting Between Numerical and Letter Permissions
There are online tools and command-line utilities available to convert between numerical and letter-based permission formats. However, memorizing the basic permission values (4 for read, 2 for write, 1 for execute) can help you with basic conversions.
While the numerical method might seem less approachable initially, understanding it can provide a more technical perspective on file permissions in the terminal environment.
Changing File Permissions with chmod
The chmod command empowers you to modify file permissions in the terminal. Here’s the basic syntax:
chmod <permission_changes> <filename>
- <permission_changes>: This specifies the modifications you want to make. It can be a combination of letters representing permissions (r, w, x) and operators to add (+), remove (-), or set (=) permissions.
- <filename>: This is the name of the file or directory whose permissions you want to adjust.
Common chmod Examples:
- Grant read permission to the group for a file: chmod g+r filename.txt
- Revoke write permission from the owner for a directory: chmod o-w directory_name
- Set all permissions (read, write, execute) for the owner and group for a file: chmod u=rwx,g=rwx filename.sh (assuming it’s a script)
Exercising Caution with File Permissions
It’s crucial to exercise caution when modifying file permissions, especially for system files or directories. Inadvertently changing permissions on critical system files could potentially render your system unstable or inoperable. If you’re unsure about the appropriate permissions for a particular file or directory, it’s best to consult your system documentation or seek guidance from a system administrator.
Additional Resources: For a detailed reference on the chmod command and permission settings, refer to the man page: man chmod within your terminal.
Essential System Commands for Effective Terminal Navigation
The terminal provides a powerful set of commands to manage your system, access information, and troubleshoot issues. Let’s explore some frequently used system commands that can enhance your terminal proficiency.
1. Locating Files and Directories (which):
- Command: which <search string>
- Description: Use the which command to locate executable files (programs) within your system’s search path. This comes in handy when you want to execute a program but are unsure of its exact location. For example, which ls would typically return the path to the ls command on your system.
2. Reviewing Command History (history):
- Command: history
- Description: The history command displays a list of the commands you’ve recently used in the terminal session. This can help recall commands you might have forgotten or reference past actions. By default, most systems limit the history to the last 500 commands.
3. Network Exploration (ifconfig, iwconfig, ping):
- Command: ifconfig
- Description: For wired network connections, ifconfig displays details about your network interfaces, including IP addresses, subnet masks, and MAC addresses. This information is useful for network configuration and troubleshooting.
- Command: iwconfig
- Description: For wireless network connections, iwconfig provides information about your wireless adapter, signal strength, and network settings. It can be helpful for diagnosing wireless connectivity issues.
- Command: ping <ip/domain>
- Description: The ping command is a fundamental tool for testing network connectivity. It sends packets to a specified IP address or domain name and waits for a response. A successful ping indicates that the target machine is reachable on the network. Use Ctrl+C to stop a continuous ping.
4. System Information (uname -a, blkid, top, lsusb, df, lspci):
- Command: uname -a
- Description: Run uname -a to gather a summary of your system information, including the operating system name, kernel version, hostname, and machine architecture.
- Command: blkid
- Description: The blkid command displays information about block devices (hard drives, partitions) connected to your system. This includes their unique identifiers (UUIDs) and filesystem types, which can be helpful for disk management tasks.
- Command: top
- Description: Use top to view a dynamic list of running processes on your system. It displays information about CPU usage, memory consumption, and process IDs (PIDs). Press q to quit the top utility.
- Command: lsusb
- Description: The lsusb command lists all USB devices currently connected to your system. This can be useful for identifying and troubleshooting USB devices.
- Command: df
- Description: Run df to get detailed information about available disk space on your mounted filesystems. This is helpful for monitoring storage usage and identifying potential low-disk-space situations.
- Command: lspci
- Description: The lspci command displays information about PCI (Peripheral Component Interconnect) devices installed on your system. This includes details about graphics cards, network adapters, and other PCI-based hardware.
By understanding and using these system commands effectively, you can gain valuable insights into your system’s health, network connectivity, and resource utilization. The terminal empowers you to become a more informed and controlled user of your computing environment.
Package Managers: The Powerhouse of Software Management in Linux
Package managers are central components of the Linux ecosystem, simplifying software installation, removal, updates, and management. These tools handle the complexities behind acquiring software, ensuring dependencies (required libraries or programs) are met, and maintaining system stability. Package managers typically operate through either a command-line interface (CLI) or a graphical user interface (GUI).
Common Types of Package Managers:
There are several popular package managers used across different Linux distributions. Here are a few examples:
- apt (Advanced Package Tool): Widely used by Debian-based distributions like Ubuntu and Mint, apt offers a powerful and user-friendly experience. It provides functionalities for installing, removing, updating, and searching for packages.
- yum (Yellowdog Update Manager): The primary package manager for Red Hat-based distributions (Red Hat Enterprise Linux, CentOS, Fedora), yum allows for similar package management tasks as apt.
- dnf (dnf Yum): A newer and more feature-rich package manager replacing yum in Fedora, dnf offers faster performance and improved dependency resolution.
- pacman: Arch Linux and its derivatives (Manjaro) utilize pacman for package management. It’s known for its rolling release model, where continuous updates are delivered, and its speed.
Package Management with apt in Ubuntu/Debian (Terminal):
Ubuntu and Debian primarily use apt for package management in the terminal. Here are some common apt commands:
- Install a package: sudo apt install <package_name> (use sudo for administrative privileges)
- Remove a package: sudo apt remove <package_name>
- Update package lists: sudo apt update (downloads information about available packages)
- Upgrade installed packages: sudo apt upgrade (installs newer versions of packages)
- Combine update and upgrade: sudo apt update && sudo apt upgrade (performs both actions sequentially)
Additional Tips for Effective Package Management:
- Keep your system updated: Regularly running sudo apt update && sudo apt upgrade ensures your system has the latest security patches and bug fixes.
- Search for packages: Use apt search <keyword> to find packages matching a specific keyword.
- Read package descriptions: Before installing, use apt show <package_name> to view details and reviews about a package.
- Consider using a graphical package manager: Many distributions offer graphical interfaces alongside command-line package managers. These GUIs can be easier to navigate for beginners.
By effectively utilizing package managers, you can maintain a well-maintained and up-to-date Linux system with the software you need.
Terminating the Command – Closure
In conclusion, this post has equipped you with the foundational knowledge to navigate the Linux terminal with confidence. We’ve covered essential commands for file management, explored how to understand and modify file permissions, and unpacked valuable system commands to monitor your system’s health. We’ve also introduced package managers, the powerhouses behind software installation and updates in Linux.
Thank you for reading all the way through! As you explore the exciting world of Linux, remember that our online shop is constantly expanding with the latest products, complete with comprehensive reviews and detailed descriptions to guide your purchases. For an even more convenient experience, sign up for our weekly email in the My Account section to stay informed about new arrivals and special offers. And on that note, here’s a quote to inspire your tech adventures: “The only person who is educated is the one who has learned how to learn and change.” – Carl Rogers. Happy exploring!
Don't miss out on the opportunity to connect with a community of like-minded individuals who are passionate about shopping, tech, lifestyle, hardware, and stationary products. Follow us on Facebook, Twitter, and LinkedIn to stay updated on our latest product releases, tech trends, lifestyle tips, hardware reviews, and stationary must-haves. By connecting with us, you'll have access to exclusive deals, updates, and the chance to engage in meaningful conversations with others who share your interests. We believe that these interactions will be a source of excitement and inspiration for your shopping and tech endeavors. So, take the next step and hit the follow button today!
The code samples and coding explanations provided on this website are for educational purposes only. By using this code, you agree that you are solely responsible for your use of it. You should exercise discretion and carefully test and review all code for errors, bugs, and vulnerabilities before relying on it. Additionally, some code snippets may be subject to an open-source license. Qwixby is not responsible for any issues or damages caused by the use of the provided code samples.
Code created by Qwixby is free to use. While it is not compulsory, we would appreciate it if you could provide a link to our tutorials at https://corporate.quickfood.co.za/blog-index/
Please note: Rarely we use AI that generates code samples. For information on how and when the AI cites sources in its responses, please refer to the FAQ.
